Faculty, staff, and student employees may access shared calendars in Office 365 Web Access and in the Outlook Desktop Client.
Opening the Room Calendar in Outlook on the Web
Sign in to Outlook on the Web.
Log in with your Marian email address and password.
Once logged in, you will see the tiles for apps available to you on the left-hand side. Click the Outlook icon.
-
Click the Calendar icon in the top left corner.
-
On the Calendars page, select Add Calendar.
Select Add from directory in the left-hand menu and enter the shared calendar into the field. This can be added using the resource number or display name
Select which calendar group you would like to add it to using the dropdown menu and click the Add button.
The calendar will now be displayed with any other calendars open.
Open a Shared Calendar in Outlook for Windows
-
At the bottom left corner, click on the calendar icon.
Click Add at the top right.
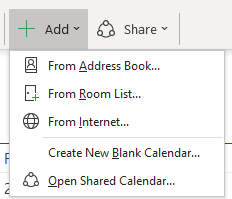
In the drop-down bar, select Open Shared Calendar...
Click Name...
-
In the top-left search bar, type in the name of the resource.
Select the shared calendar from the list and click OK.
Click OK.
The shared calendar will now appear in the left sidebar. Click the checkmark next to it for it to be displayed.